
Welcome to my ultimate guide on capturing the elusive, magical voice of the theremin. Whether you are a classically trained musician stepping into the recording studio for the very first time, an electronic music producer looking to integrate organic space-controlled sounds into your tracks, or a dedicated hobbyist building your first home recording setup, this comprehensive article is written specifically for you. This guide is built upon the foundational knowledge I shared during my “Theremin Sound Recording” workshop on April 26, 2026. I understand that taking the leap from playing live in a room to capturing that performance in a DAW can be incredibly daunting. I am here to guide you step-by-step, ensuring your tracking quality reaches a professional, broadcast-ready standard without losing the expressive soul of your playing.

The theremin is entirely unique in the world of musical instruments. Because it relies on capacitive interaction within electric fields and is played without any physical contact, it interacts with its electronic environment in ways that a guitar, a violin, or a traditional hardware synthesiser simply does not. Recording the theremin often feels like a dark art. The instrument is incredibly expressive, capable of mimicking the nuanced vibrato of the human voice or a soaring cello, but capturing that beautiful, vocal tone in a studio or at home without introducing humming, buzzing, or latency can be incredibly frustrating. I am going to demystify this process completely, breaking down the physics and the practical applications of studio engineering specifically tailored for the instrument.
Think of your recording signal chain like a highly pressurised pipe carrying water. The audio signal flows from the instrument’s internal oscillators, travels down through the instrument cable, enters the preamplifiers of the audio interface, gets mathematically converted into digital data, travels through the computer’s CPU via the Digital Audio Workstation (DAW), and finally flows out to your studio monitor speakers or headphones. The golden rule of audio engineering applies here perfectly: your recording is only as strong as its weakest link.

A bad cable with poor shielding, the wrong type of impedance input on your interface, or an incorrect digital monitoring setting will absolutely ruin an otherwise perfect musical performance. You can spend thousands of euros on a professional instrument, but if your interface introduces twenty milliseconds of latency, your intonation will be destroyed before the sound even hits the hard drive. My goal today is to makey single link in that signal chain bulletproof.
1. Understanding Signal Levels: The Physics of Audio
Before you even think about plugging a single cable into a socket, you absolutely must understand the fundamental physics of audio signal levels. This is where the vast majority of technical mistakes happen for beginners, and even for seasoned musicians who are transitioning to the theremin from other acoustic or electric instruments. If you mismatch levels, you will either suffer from a terrible hissing noise floor, or harsh digital clipping.
💡 Two units, two worlds: dBu vs dBFS. Throughout this guide you will see two related but different decibel units. They live in different worlds.
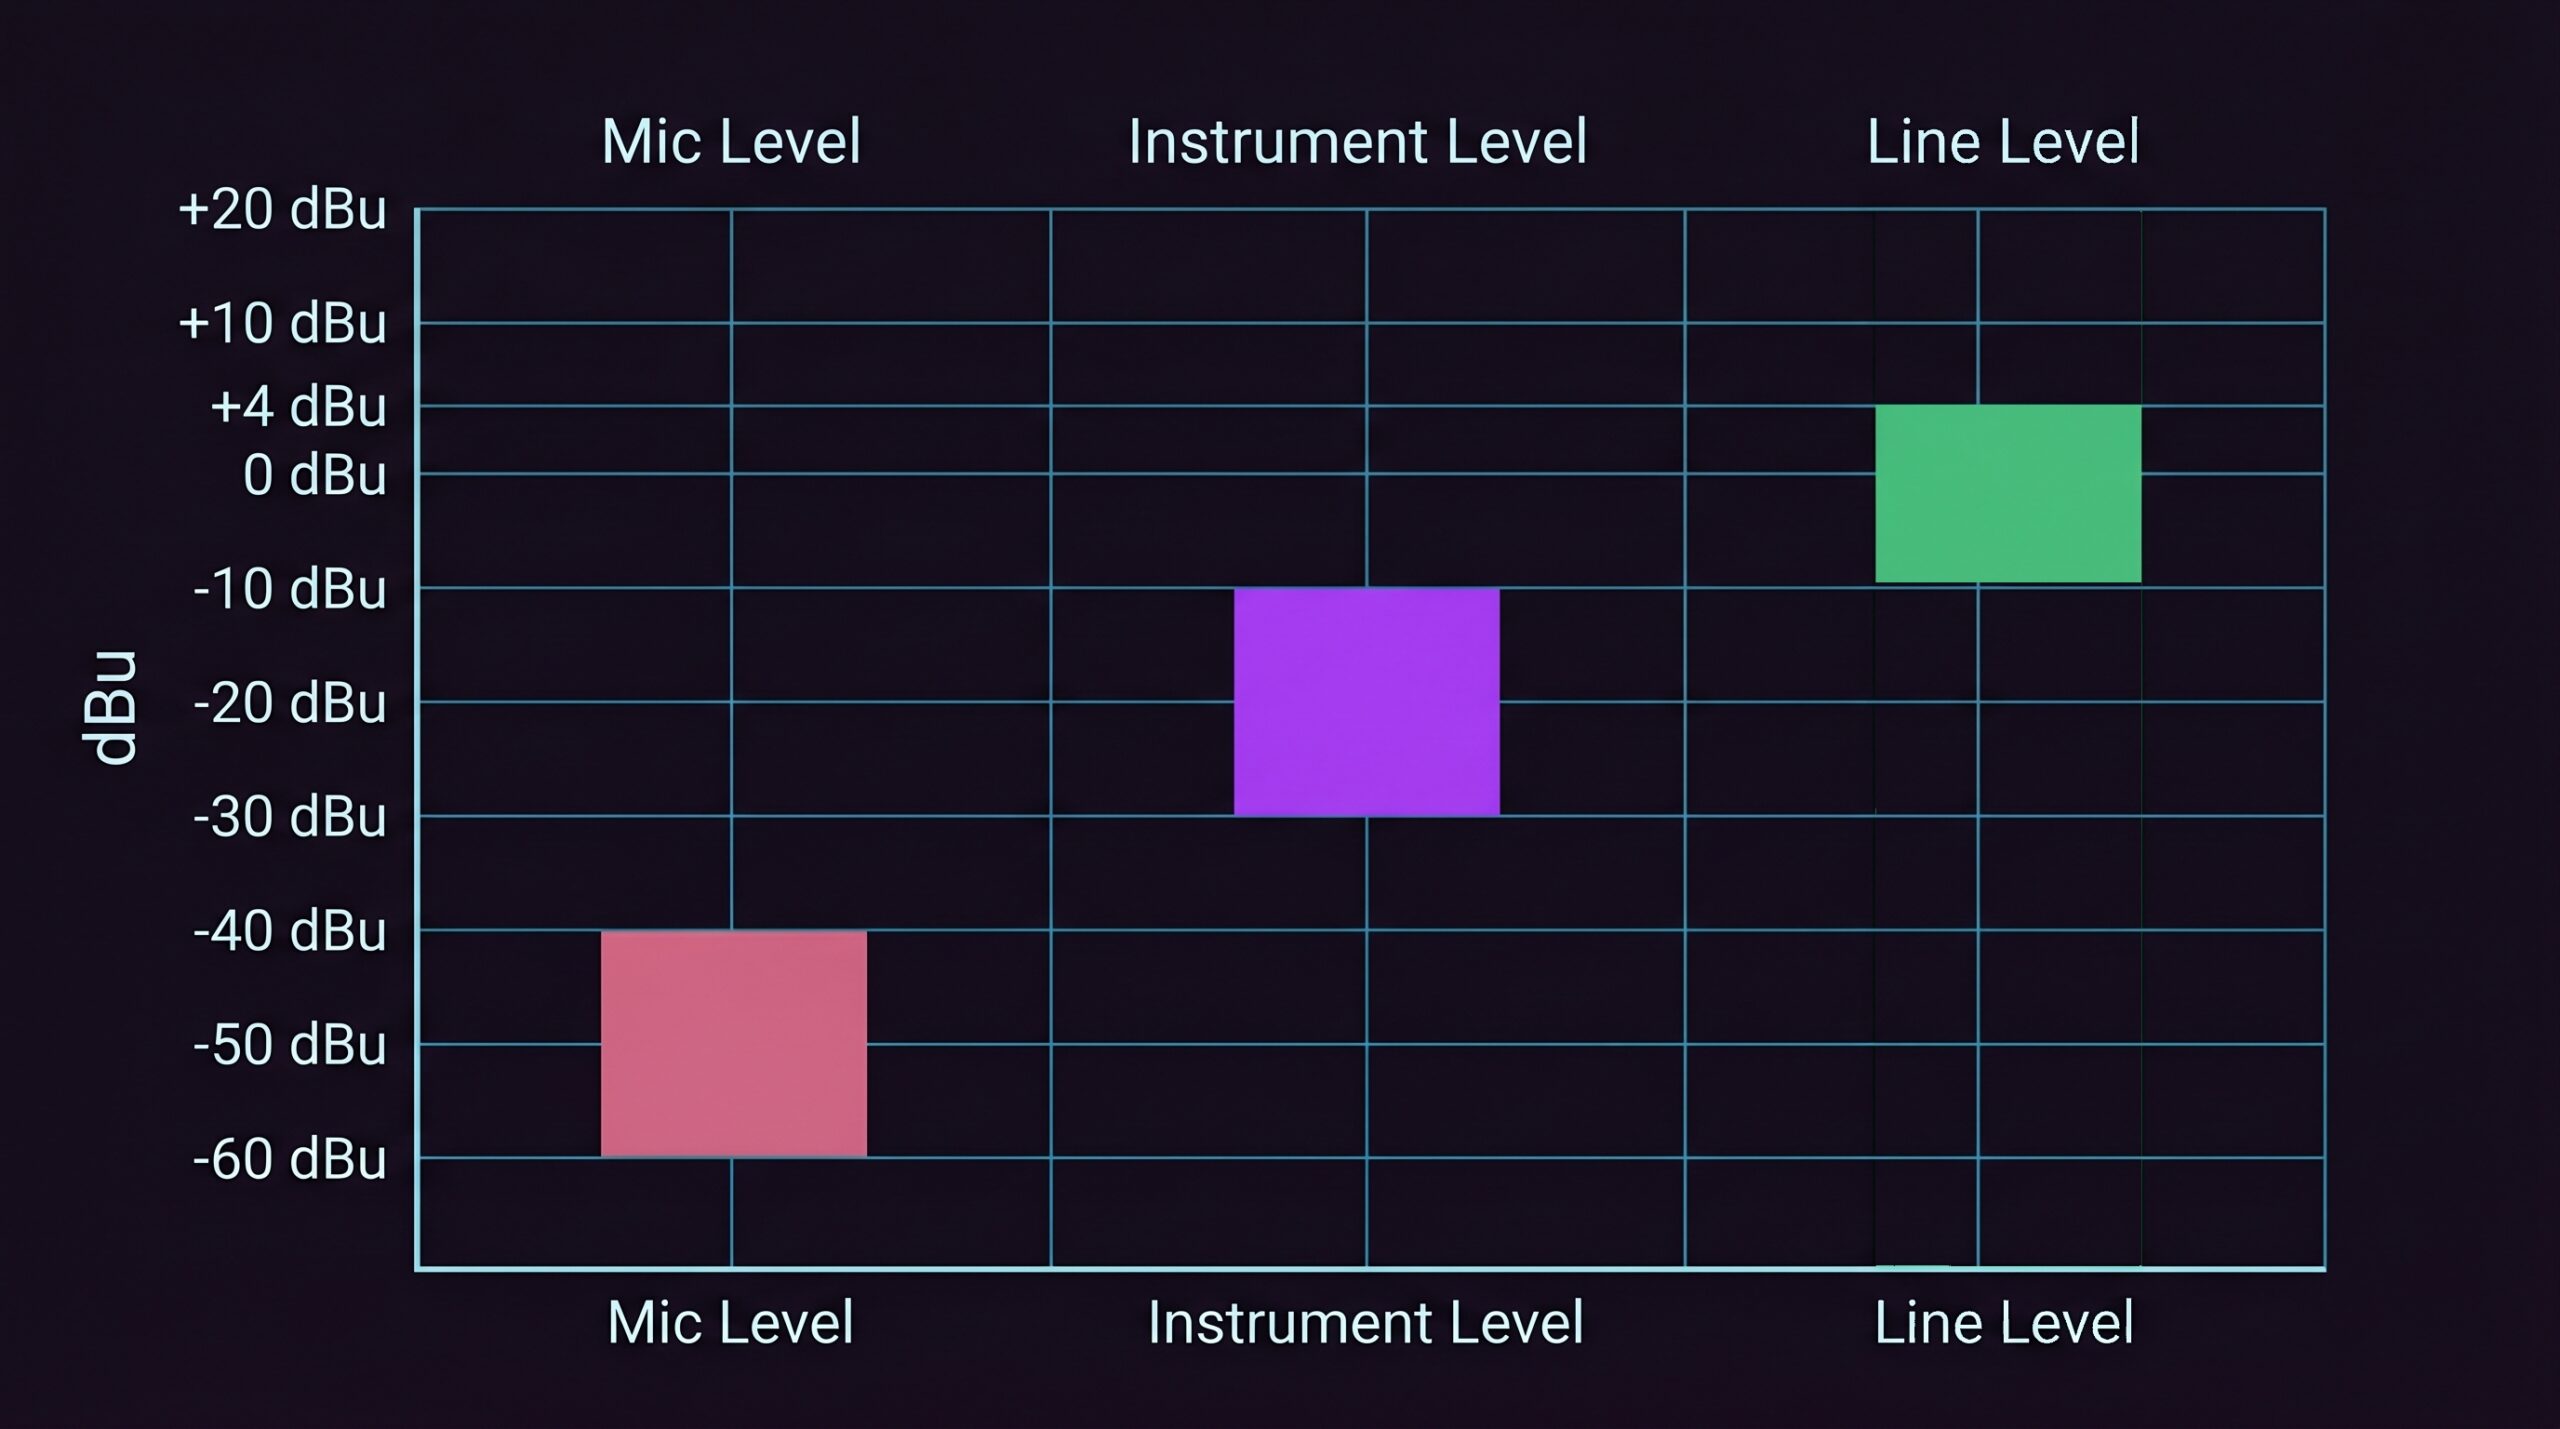
dBu describes signal voltage on a cable (analogue domain). Reference is 0.775 V RMS. Used for source levels: mic = –60 dBu, instrument = –20 dBu, line = +4 dBu (pro) / –10 dBV (consumer).
dBFS describes signal level inside your DAW (digital domain). Reference is the maximum the digital format can represent. 0 dBFS = clipping; everything useful sits below it. Used for record levels and meter readings.
The two are linked by your interface’s calibration: typically 0 dBFS on the meters corresponds to about +24 dBu coming in from the cable. So a line-level source (+4 dBu) lands at roughly –20 dBFS on the digital meter — leaving healthy headroom for performance peaks.
Signal levels categories:
- Mic Level: This is a very, very low electrical signal (typically around -60 dBu). Think of it as a delicate whisper. It desperately needs a dedicated microphone preamplifier to boost it to a usable volume before it can be recorded. This level is generated by dynamic and condenser microphones catching acoustic soundwaves moving through the air.
- Instrument Level: This is a low signal (around -20 dBu). It is like speaking at a conversational volume. It requires a Hi-Z (high electrical impedance) instrument input to sound correct without losing its high frequencies. This signal is generated by passive electric guitars and bass guitars containing magnetic pickups.
- Line Level: This is a massive, strong, and powerful signal (operating around +4 dBu for professional studio gear or -10 dBu for consumer gear). It is like shouting. It connects directly to a line input without needing any extra pre-amplification. This is typically generated by electronic keyboards, drum machines, mixing consoles, and synthesisers.
The critical fact you must remember: Most modern performance theremins output an unbalanced signal at approximately line level – but this is not universal. High-end performance models typically output at professional line level, while many DIY designs and some vintage instruments can output at instrument level and require a high-impedance input or a preamp stage. Before connecting any theremin to an interface, check the manufacturer’s output specifications. Treating a weak instrument-level output as line level results in a noisy, low-amplitude recording; treating a hot line-level output as mic level will clip the preamp input immediately.
Because the theremin contains internal oscillators and an active amplifier circuit before the audio even reaches the output jack, the voltage it sends down the cable is huge compared to a passive guitar. If you plug your theremin directly into a highly sensitive microphone preamp or a standard guitar amplifier input, you are effectively forcing a shout into an ear designed for whispers. You cannot break the laws of physics.
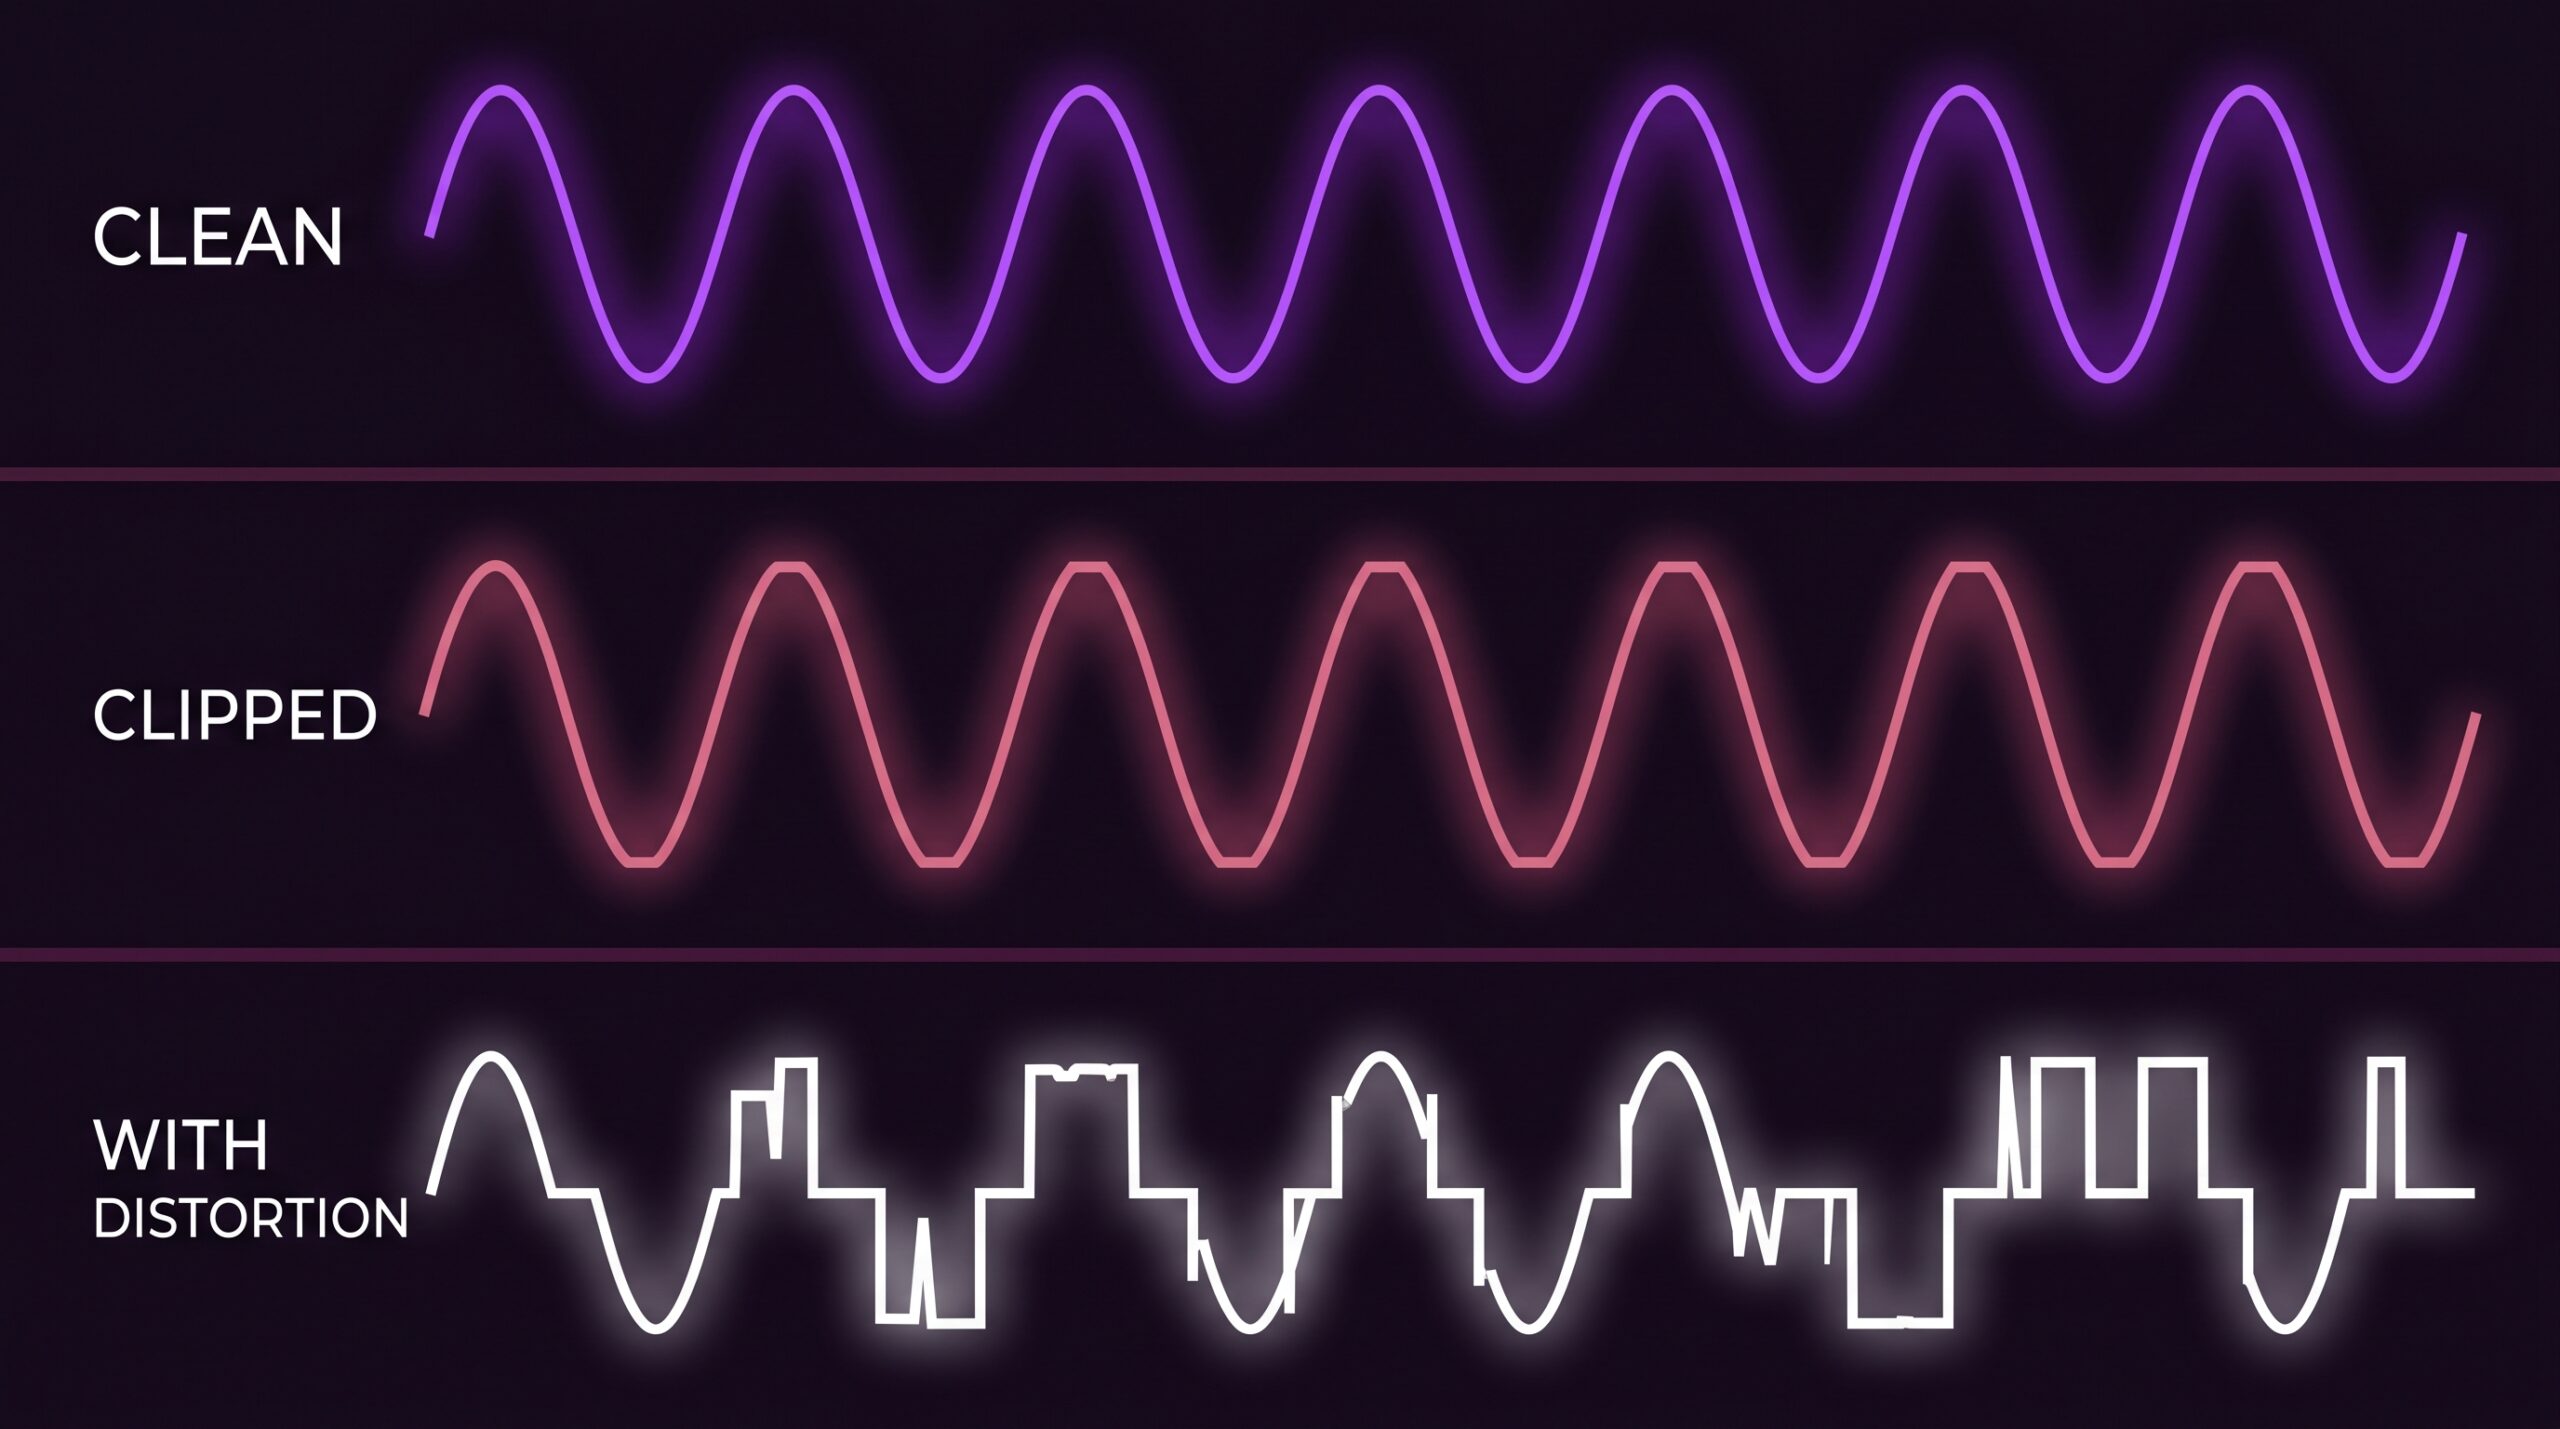
You will overload the analogue circuit instantly, clipping the waveform. Your beautiful, pure sine-like tone will turn into harsh, unpleasant square-wave distortion. You must always treat your theremin as a powerful Line Level device. Always check your hardware switches before playing a note.
Do: Use a LINE input on your audio interface (with a standard TS instrument cable), or use a DI box to actively step the massive signal down to MIC level. If you are using an external speaker for practice in the room, use a keyboard amplifier or an active studio monitor that expects a strong signal from a synthesiser.
Don’t: Thereminists must avoid plugging the theremin’s output directly into microphone preamp inputs or guitar amplifier inputs. A hot line-level signal routed directly into a mic preamp will overload its input stage and cause immediate clipping. The correct approach is to use a dedicated line input on the audio interface — or, when running a balanced cable, to go through a DI box first, which steps the signal down to a controlled level before it reaches the preamp.
2. The Five Connection Options Explored
How you connect the instrument physically dictates the foundation of your recorded tone. Let me explore the five primary methods available to the home and studio recordist, comparing their benefits, their ideal real-world use cases, and their common pitfalls.
Option 1: Direct to Audio Interface
This is the cleanest, most direct path, and it is the highly recommended starting point for most players, especially in a home studio environment. You simply connect the Theremin’s Line Out directly to your Audio Interface’s Line In using a high-quality TS (Tip-Sleeve) unbalanced cable. This eliminates any middleman hardware.
When to use it: Use this method when you want the purest, most analytical recording of your pitch technique. It is absolutely perfect for clinical tracking and ensuring no external acoustic room noise is introduced into the signal. The dry track gives you total freedom to apply plugins later. This is the optimal configuration for capturing reference recordings or when you want to heavily sculpt the sound in post-production without baking in hardware colouration early on.
Typical mistakes: Plugging into an interface input that is hardware-switched to ‘Inst’ (Instrument) mode instead of ‘Line’ mode. This leads to an immediate loss of headroom and scratchy digital clipping when you play loud, high notes or aggressive staccato passages. Another common error is using exceptionally long unbalanced cables (over 5 metres) which will inevitably pick up radio frequency interference.
Real-world tip: Pay close attention to your gain staging. Turn the physical gain knob on your interface all the way down to zero before you begin. The theremin’s line-level output is usually hot enough that you barely need any preamp gain to hit healthy peaks between -12 and -6 dBFS, with crescendos never exceeding –3 dBFS. Let the instrument do the heavy lifting.
Option 2: Via an Amplifier
Sometimes you want the physical moving air and the distinct acoustic character of a real speaker cone pushing sound waves into a room. You can route the theremin through an amplifier using two distinct paths: Path A (Line Out from Amp) which provides a clean signal that benefits from the amplifier’s internal EQ and tone shaping circuitry, and Path B (Microphone the Speaker) where you place a microphone like a classic Shure SM57 dynamic in front of the speaker cone.

When to use it: When you are chasing a specific vintage, textured tone, or when the theremin sounds too ‘sterile’ and digital when recorded directly into the computer. Miking an amp adds natural harmonic distortion and ‘air’ that digital software plugins still struggle to emulate perfectly. It is also an excellent option when tracking a live ensemble where bleed between microphones in the room is intentionally part of the desired aesthetic.
Typical mistakes: Using an electric guitar amplifier. Guitar amps are built to expect a weak -20 dBu signal, and their frequency response is heavily skewed (purposefully boosting the mid-range and cutting the bass and extreme highs). A theremin will sound boxy, nasal, and distorted through a Fender or Marshall guitar amp. Furthermore, placing the amplifier too close to the theremin’s pitch antenna will drastically alter your playing field.
Real-world tip: Always use keyboard amplifiers (such as the Roland KC series, Laney AH, or Behringer KXD/B205) or active PA monitor speakers. These are designed as FRFR (Full Range Flat Response) systems capable of handling line-level synth signals without breaking a sweat. When placing a microphone in front of the speaker, angle it slightly off-centre to avoid harsh, high-frequency whistling and to capture a smoother overall tone.
Option 3: Using a DI Box
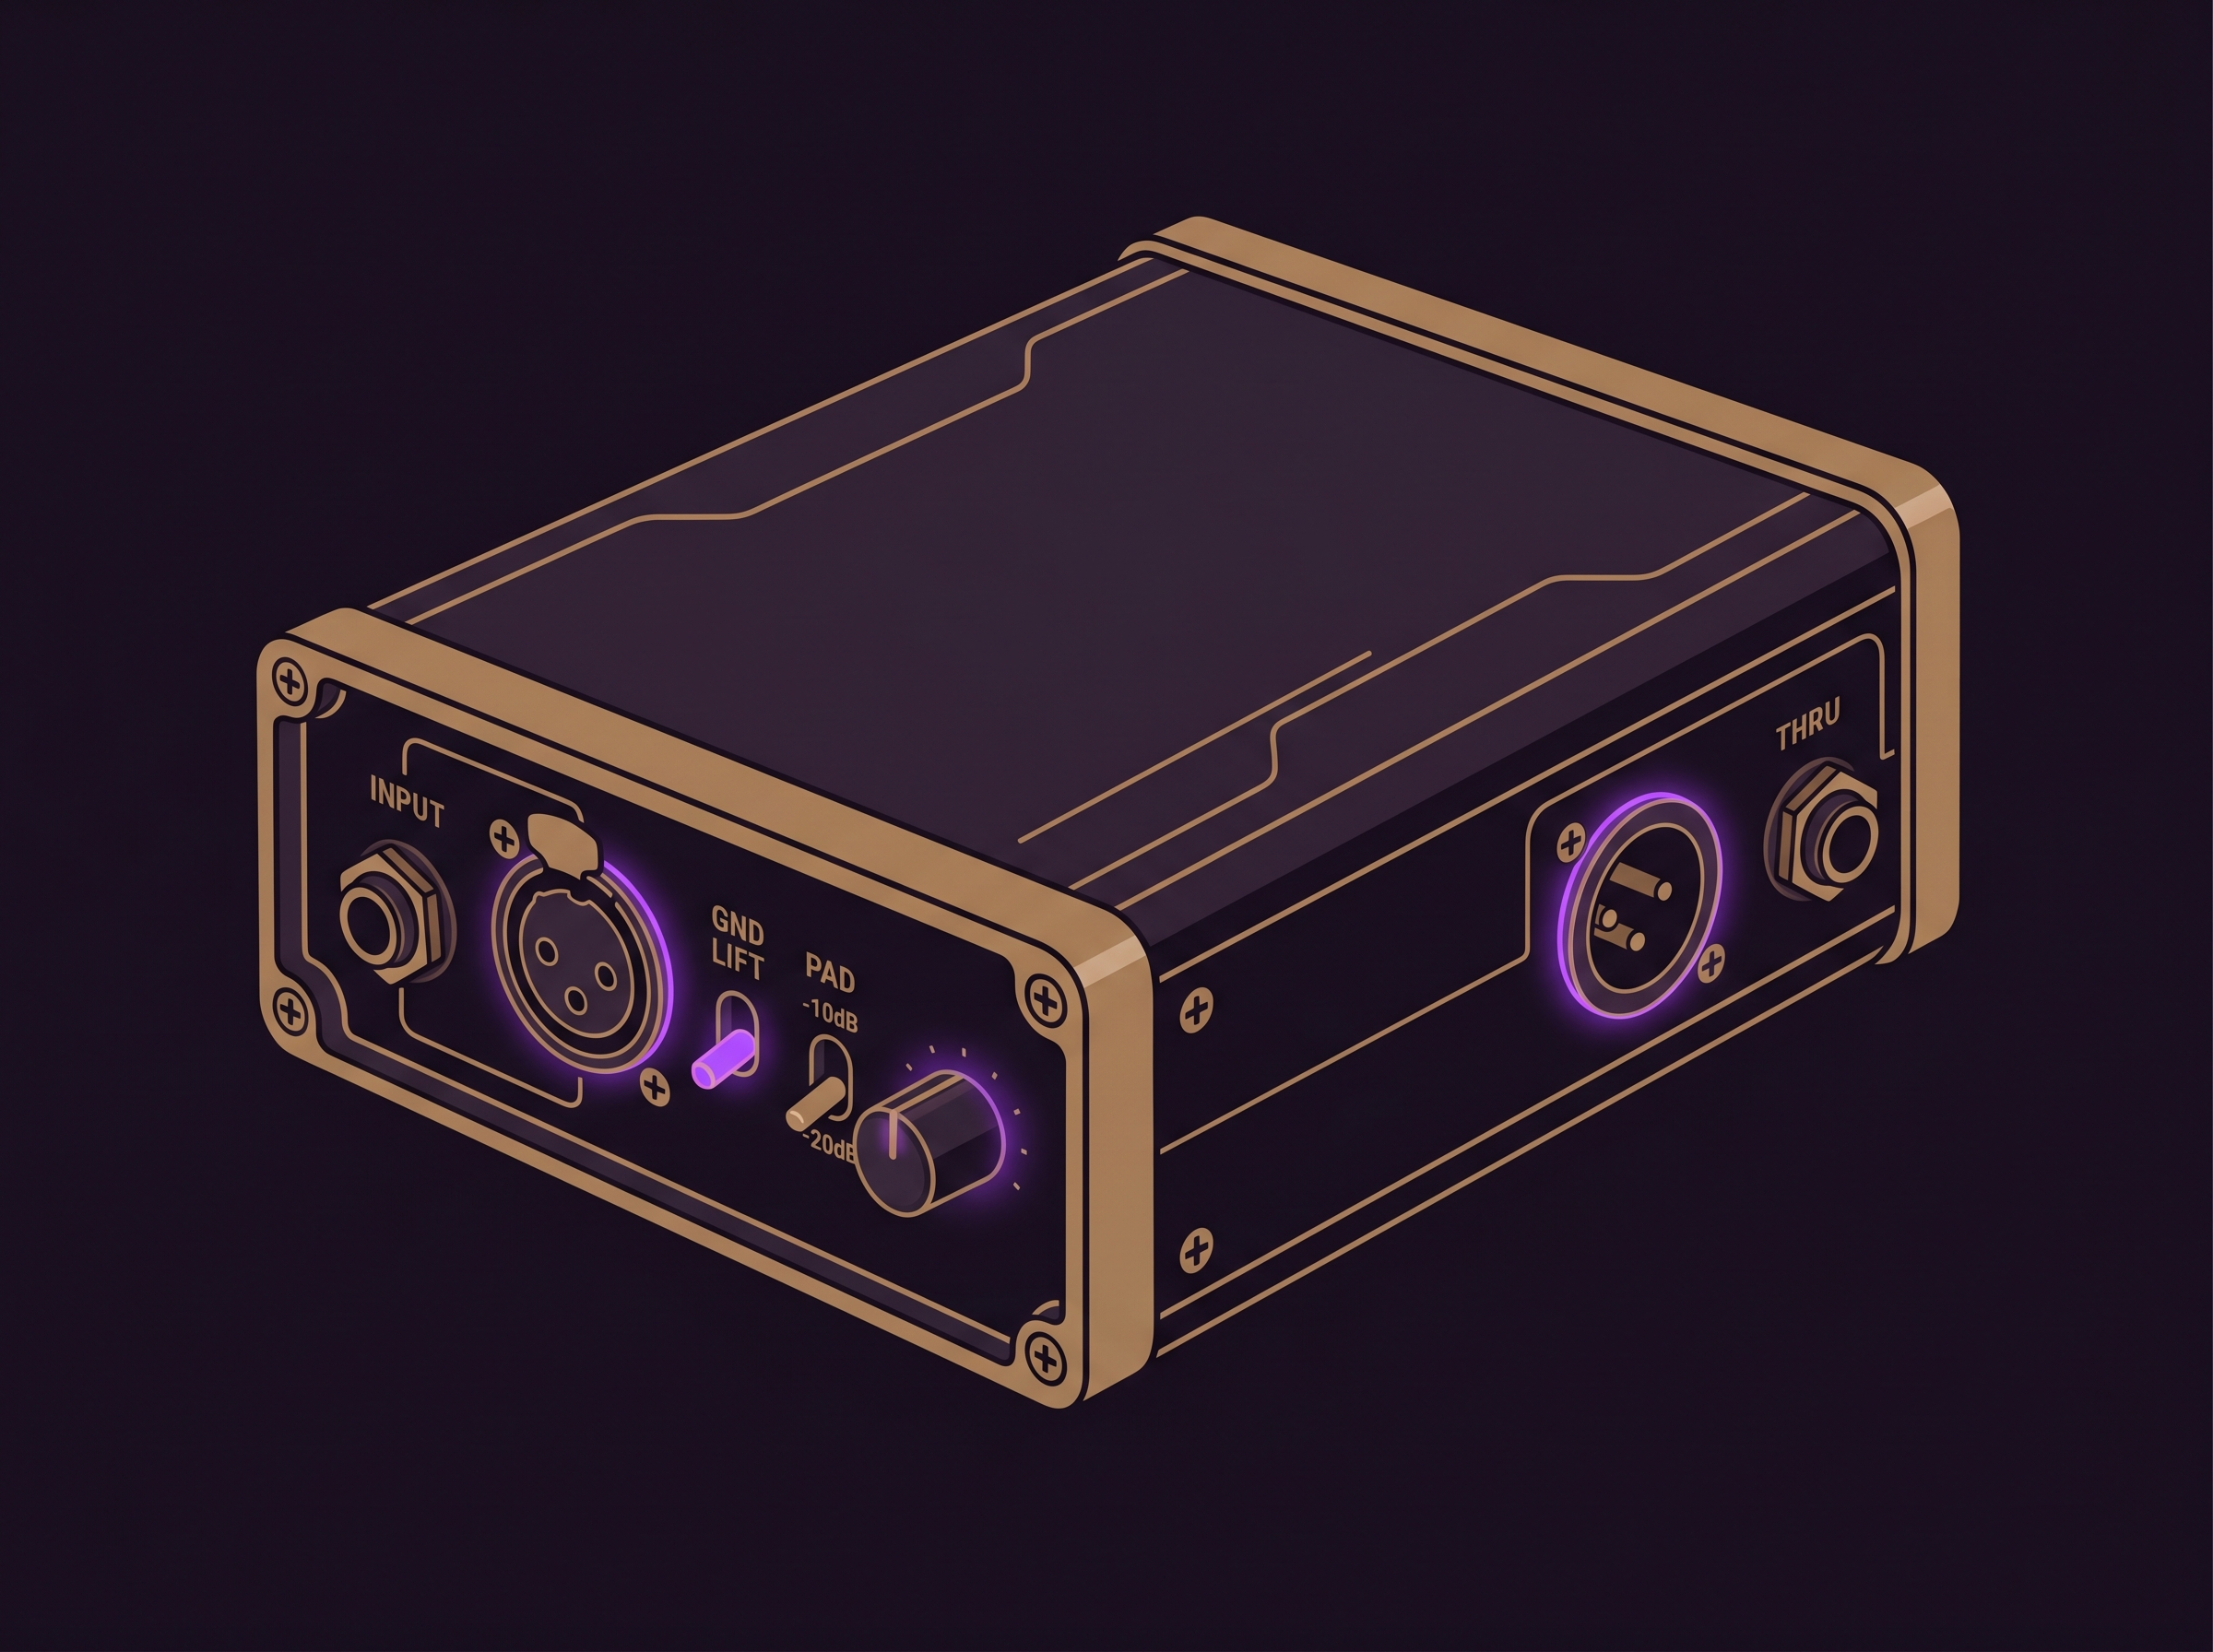
A DI (Direct Injection) Box is an absolute essential survival kit for my recording setup, especially when I’m working in complex, electronically noisy spaces. It takes the unbalanced, high-impedance TS signal from my theremin and converts it to a balanced, low-impedance XLR signal. This elegantly solves three massive physics problems simultaneously:
- 1. Impedance Matching: By converting my instrument’s high-impedance (High-Z) signal to a low-impedance (Low-Z) one, the DI box ensures that I don’t lose precious high-frequency detail. Without this matching, the tone can often become “dull” or “muddy” before it even reaches the interface.
- 2. Noise Rejection: Unbalanced standard cables act exactly like radio antennas. If my cable run is longer than 5 or 6 metres, it will actively suck up electromagnetic interference. A DI box converts the signal to balanced audio, which uses a phase-cancellation trick to completely kill noise even over very long distances.
- 3. Ground Isolation: This is my primary weapon against the dreaded 50 Hz/60 Hz hum. The magnetic isolation transformer inside a passive DI box physically breaks the electrical connection between the theremin and the computer, snapping ground loops instantly.
When to use it: Whenever you are on a live stage, whenever you have to run a cable across a long room to a studio snake, or whenever you encounter an unfixable ground hum in your home studio that swapping power sockets cannot fix. It is the ultimate insurance policy against bad venue wiring and radio frequency interference.
Typical mistakes: Reaching for an Active DI box without checking its input headroom specifications. Active DIs – which can be powered by battery or 48V phantom power – are designed for a wide range of sources, but cheaper models have limited input headroom and will clip when hit with a hot theremin signal.
Real-world tip: A heavy, rugged Passive DI containing a high-quality transformer is the more reliable choice: it has no active circuitry to overload and handles large signals gracefully. Always engage the PAD switch (usually −15 dB or −20 dB) on the DI box to attenuate the theremin’s output before it hits the transformer, keeping your deep, sweeping bass notes crystal clear. Another common mistake is forgetting to engage the ground lift switch when a hum is actually present.
Option 4: Mixing Desk / Mixer
Routing through an analogue or digital mixing console is ideal for a permanent home studio installation or a complex live setup where you have backing tracks, drum machines, or a vocal microphone running simultaneously. It gives you incredible routing flexibility, allowing you to send a wet effects mix to your monitors and a dry mix to the DAW.

When to use it: When you are performing live streams with multiple instruments, podcasting, or when you need tactile hardware EQ knobs at your fingertips during a fast-paced tracking session. It is also excellent for routing a zero-latency headphone mix to multiple musicians playing together in the same room without taxing the computer’s CPU.
Typical mistakes: Poor gain staging across multiple cascaded devices. If you boost the gain on the mixer, then boost it again on the audio interface, you amplify the self-noise of both preamps exponentially, resulting in a horrible hissing noise floor that ruins quiet, lyrical musical passages. Over-equalising at the tracking stage can also back you into a corner during mixing.
Real-world tip: For a simple solo theremin recording, a mixer is almost always overkill. Every extra circuit board, EQ stage, and fader your audio passes through degrades the signal slightly. Remember: the simplest path is the cleanest signal. If you do use a mixer, utilise its balanced XLR outputs to connect to your audio interface for the cleanest possible transfer.
Option 5: Portable Field Recorder
A fascinating and increasingly popular alternative to traditional computer-based recording is capturing your performance directly into a portable field recorder, such as a Zoom H4n, H5, or H6, a Tascam DR series, or a high-end Sony PCM unit. In this minimalist scenario, you completely remove the computer, the DAW, and the audio interface from your signal chain. You plug the theremin directly into the line inputs of the recorder, operating entirely on battery power. This setup is particularly appealing to thereminists because it entirely side-steps the complexities of USB drivers and grounding issues.
Advantages:
- Battery-powered operation provides incredibly clean, isolated power, completely eliminating any risk of USB ground hum or mains power interference.
- It is truly portable and lightweight, easily fitting in a bag alongside your theremin.
- Hardware monitoring through the recorder’s headphone jack offers zero latency by design.
- The built-in preamps feature dedicated line inputs (as most modern field recorders easily accept a line-level signal).
- It is absolutely perfect for outdoor recording sessions, live performances, or seamlessly capturing rehearsals without bringing a laptop.
Considerations:
- These devices usually export raw WAV files. You will still need to import these files into a DAW later on a computer for any editing, mixing, or post-production.
- Input level setting is absolutely critical. You must aim for peaks between –12 and –6 dBFS with hard ceiling at –3 dBFS, and the small LED screens do not provide real-time metering that is as forgiving or easy to read as DAW software.
- There are no real-time effects or complex processing capabilities during the recording stage.
- The smaller screens mean visual feedback on your waveform and clipping is limited.
When to use it: This option shines during outdoor recording, live shows, when you desire a strictly minimalist setup, when capturing quick reference takes, or when you are forced to perform in environments with notoriously bad mains power wiring.
3. Audio Interface Requirements in Detail
Not all audio interfaces are created equal, and the theremin demands specific hardware tolerances that a standard vocal microphone does not. First and foremost, the interface must feature dedicated Line-Level Inputs. Look for a dedicated ‘Line In’ TRS jack or a ‘Combo’ XLR jack that has a switchable hardware line pad. It must be able to handle peaks of +4 dBu without the red clipping light turning on.
You absolutely need a 24-bit depth analogue-to-digital converter. 16-bit audio (CD quality) simply does not offer enough mathematical dynamic range to capture the extreme, sudden swells of a thereminist’s volume hand without hitting the noise floor in the quietest moments. A sample rate of 44.1 kHz or 48 kHz is perfectly sufficient; recording a theremin at 96 kHz or 192 kHz just wastes hard drive space and CPU power, as the instrument does not produce ultrasonic harmonics that require ultra-high sample rates to be captured accurately.
Hardware direct monitoring with near-zero latency – the interface must support zero-latency hardware monitoring (signal routed directly from input to headphone output in analog domain, bypassing the DAW entirely). DAW round-trip latency figures are irrelevant when hardware monitoring is used correctly.
Finally, pay close attention to power delivery. Small, cheap bus-powered USB interfaces draw their electricity directly from the laptop motherboard. This power is often inherently noisy and fluctuates rapidly depending on what the computer is processing, which can cause the theremin to hum due to poor grounding. Wall-powered interfaces (with a dedicated AC power brick plugging into the mains) are vastly more stable, providing a robust electrical earth ground that acts as a silent anchor for the theremin’s sensitive internal oscillators.
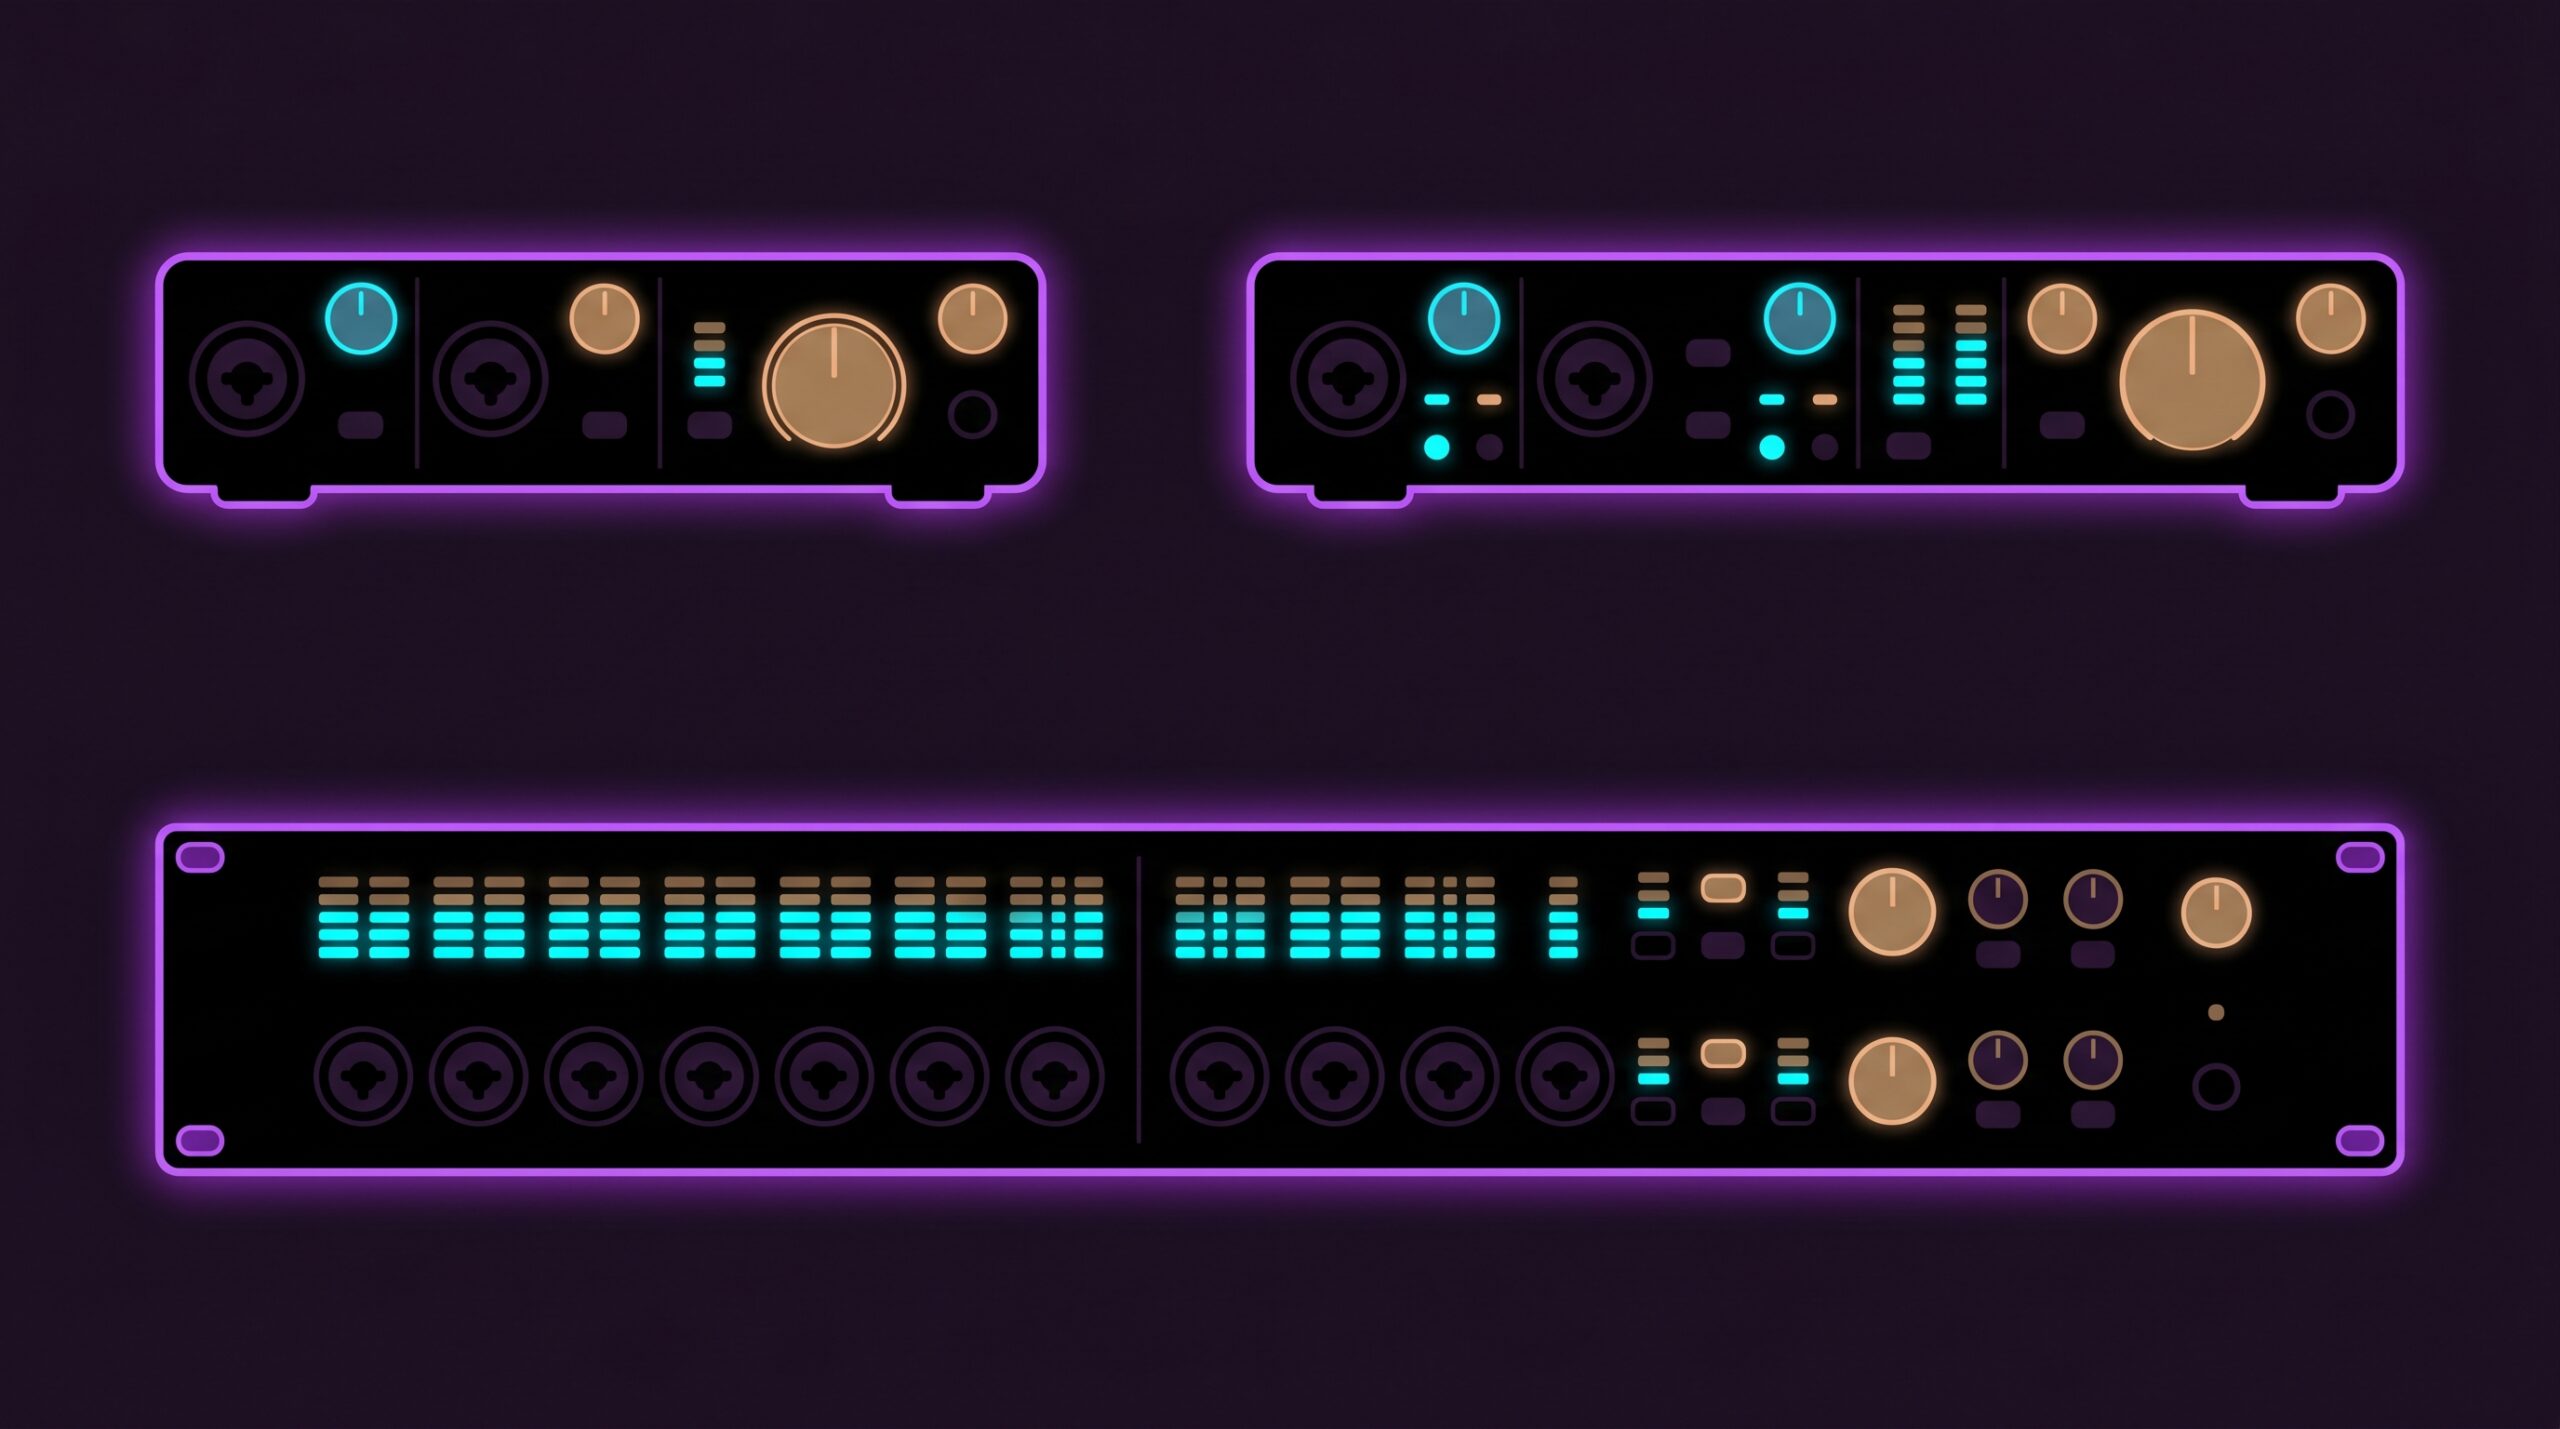
Excellent, affordable options that meet all these strict criteria include the Focusrite Scarlett 2i2 or 4i4 (great reliable, clean preamps), the Audient iD14 (exceptional console-grade JFET preamps that add subtle warmth), the MOTU M2 (superb ESS Sabre DACs and incredibly low RTL drivers), the Universal Audio Volt series, and the budget-friendly but highly capable Behringer UMC202HD.
Pro tip when buying: Check what software is bundled with the interface. Most manufacturers include a lite version of a DAW (such as Ableton Live Lite, Cubase LE/AI, or Pro Tools Intro), and sometimes plugin bundles or virtual instruments worth $50–200. Focusrite, Audient, MOTU, and Universal Audio are particularly generous with their bundles. This can effectively cover the cost of a starter DAW when you are getting set up — a real bonus that does not appear in the basic spec sheet.
4. Grounding & Electromagnetic Interference (EMI)

Now I enter the true danger zone of theremin ownership. The theremin is not just a musical instrument; from a physics standpoint, it is a highly sensitive device based on the heterodyning principle that reacts to the slightest changes in capacitance. Modern houses, apartments, and recording studios are absolutely saturated with invisible electromagnetic garbage, and your theremin hears every single bit of it, amplifying it through the speakers.
Common culprits are everywhere.
- Light dimmers are notorious – even when only partially turned on, they chop the AC waveform and emit a harsh, buzzing distortion into the air.
- WiFi routers – can cause random pitch instability in theremin designs with oscillators running at 800 kHz–1 MHz or higher, through RF rectification in transistor junctions rather than direct antenna coupling. Effect is negligible on well-shielded instruments and classical designs with lower oscillator frequencies (200–300 kHz).
- Cheap phone or laptop USB chargers use Switch-Mode Power Supplies (SMPS) that inject terrifying high-frequency switching noise directly into your power grid.
- Neon lights, old refrigerators starting up in the kitchen, and even large metal studio desks near the antennas will warp your pitch field and introduce noise.
- Ground loops (50/60 Hz hum)
Ground loops (50/60 Hz hum) occur when two or more pieces of equipment are connected to AC outlets with slightly different ground potentials. The audio cable between them becomes a conductor for that potential difference, and current flows through the shield – inducing a continuous hum at mains frequency (50 Hz in Europe, 60 Hz in North America) and often its harmonics (100/120 Hz, 150/180 Hz).
The theremin is uniquely vulnerable for two reasons. First, its output is unbalanced – a TS cable carries signal on a single core with the shield doubling as ground reference carries both signal and ground reference, with no differential rejection of common-mode noise. Second, the performer’s body is physically part of the instrument’s capacitive circuit. If the player is touching a grounded object (a music stand, a metal chair, a laptop) that has a different ground potential than the theremin, that difference appears directly as a modulation of the pitch and volume fields.
Solutions in order of effectiveness:
- Share one power outlet. Plug the theremin and the audio interface into the same
power strip. This eliminates the most common potential difference at the source. - DI box with ground lift switch. The lift disconnects the cable shield at one
end, breaking the current loop without removing the safety earth from either device. - Balanced cabling (XLR/TRS). Balanced connections reject common-mode noise – if
your theremin supports a balanced output, use it.
Do not attempt to fix ground loop hum in post-processing — a 50/60 Hz notch filter removes hum but leaves harmonics and degrades low-frequency tone. Solve it at the electrical source before recording.
Troubleshooting Scenarios: If you hear noise, you must act like a detective and fix it in the physical room. Never rely on digital noise-reduction plugins later in the mix, as they will inevitably destroy the delicate, vocal overtones and natural decay of your instrument.
- Scenario A – High-pitched whine or squeal: Turn off ALL light dimmers in the house. Unplug every single phone and laptop charger in the room. Do not just turn them off at the socket; physically unplug them from the wall to disconnect their transformers.
- Scenario B – Random clicks and digital chatter: Move your WiFi router to another room, or switch your phone to airplane mode. Smartwatches constantly polling for Bluetooth can also cause pulsing interference near the volume loop.
- Scenario C – Deep, constant 50 Hz or 60 Hz hum: You have a ground loop. Try plugging your audio interface, your laptop, and the theremin into the exact same high-quality power strip to ensure they share the same ground potential. If that fails, try running an extension cord to a socket in the kitchen (they often have much stricter, cleaner earth grounding). Ultimately, use a passive DI box and flip the GROUND LIFT switch to break the loop mechanically.
- Scenario D – Laptop power supply noise: Sometimes simply unplugging your laptop from the mains and running it purely on battery power will instantly eliminate a nasty ground loop. If the noise vanishes when the laptop is un-tethered, you have isolated the issue to a dirty power grid.
- Scenario E – USB data noise: A high-pitched, scratchy sound that changes pitch when you move your mouse or open a software window indicates USB ground noise. An inexpensive USB ground isolator dongle placed between your computer and audio interface can effectively decouple the digital noise from your analogue audio path.
Sometimes, the standard solutions are not enough, especially when you are dealing with battery-powered portable setups where a true earth ground from the mains is physically absent. This leads me to one of my own and unconventional solutions in the theremin community. Picture the scene: a packed, dimly lit venue in Berlin, minutes before the performance. The thereminist steps on stage, only to find the vintage electrical wiring is causing massive grounding instability. The instrument is completely untameable, squealing and shifting pitch wildly. Desperate times call for desperate measures, leading to the deployment of this legendary physical hack.
The Teaspoon Trick: This ingenious workaround was born in my head out of necessity to practice theremin in a hotel with a dirty (noisy) grounding. If you are playing a battery-powered setup (like an Open Theremin running off a power bank) and the instrument feels unstable, jittery, or completely unresponsive to your hand movements, try this: Take a standard piece of wire with crocodile clips on each end. Clip one end to the theremin’s ground connection (or the metal sleeve of the output jack). Clip the other end to a standard metal teaspoon, and place that spoon directly inside your sock, pressed tightly against the bare skin of your ankle. Because the human body is largely composed of saltwater and acts as a massive capacitor, you instantly become a clean, silent, massive ground reference for the instrument. It looks silly, but it stabilises the capacitive field entirely!
🚨 CRITICAL SAFETY WARNING: You must ONLY use this trick if your ENTIRE signal chain is 100% battery-powered (e.g., theremin on a power bank, plugged into a battery-powered field recorder or a portable Bluetooth speaker). NEVER physically attach your body to the ground of the theremin if the instrument, your amplifier, or your mixing desk is plugged into a 220V/110V wall socket. If a power supply fails inside your amplifier, lethal mains voltage can travel up the audio cable and pass directly through your heart to the floor. If you are connected to mains power, rely on the wall’s earth ground, or use a Passive DI Box to safely isolate the instrument!
5. DAW Setup & The Psychology of Monitoring
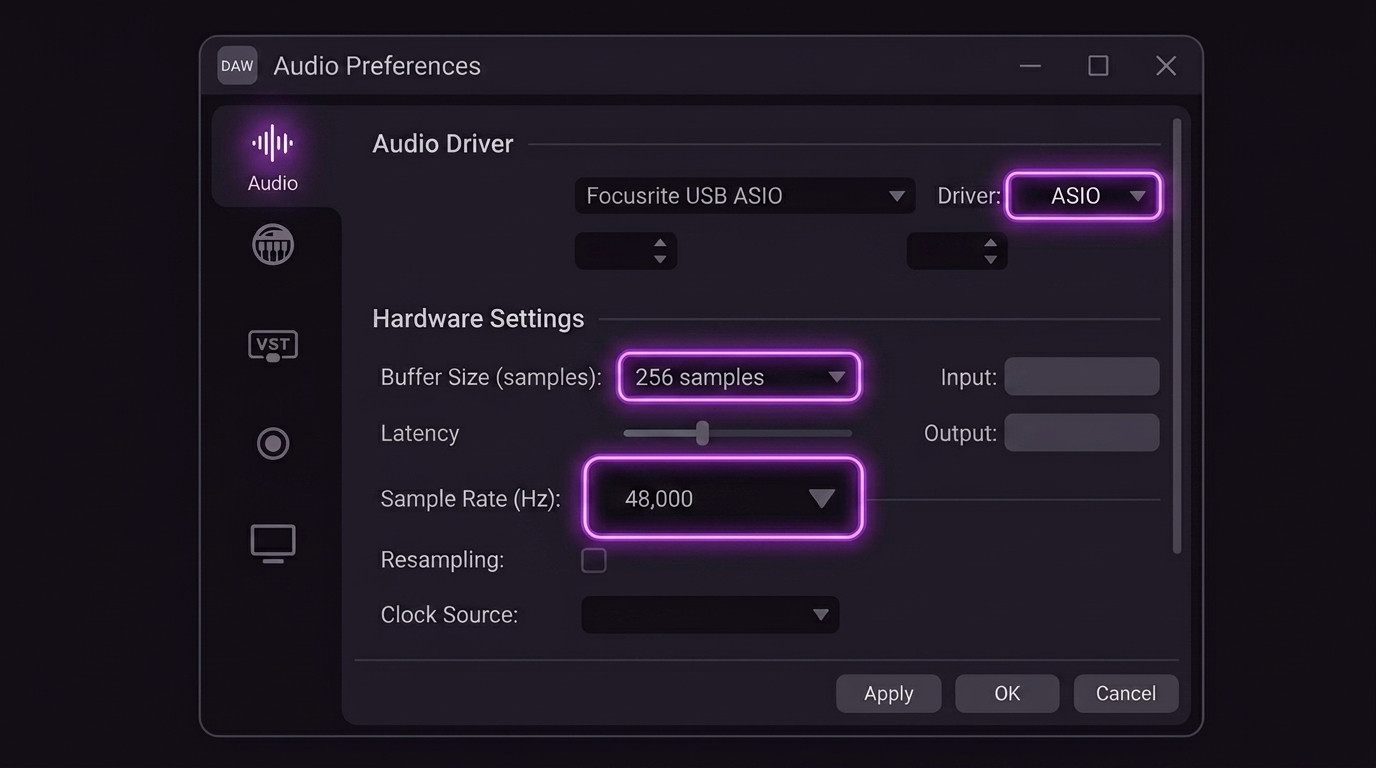
Inside your computer, configuring your Digital Audio Workstation (DAW) correctly is the final technical hurdle before you can capture a performance. You absolutely must use ASIO drivers on Windows (which bypass the sluggish Windows Kernel mixer entirely to communicate directly with the hardware) or native Core Audio drivers on Mac. Set your buffer size as low as your CPU can handle without clicking—typically 64 to 128 samples—while recording.
Choosing Your DAW
Every major DAW is capable of recording the theremin beautifully, but here is a quick breakdown of how the popular options stack up specifically for tracking live instruments:
- Reaper: Plus: Incredibly efficient and affordable, offering unmatched routing flexibility. Minus: Requires extensive manual configuration to set up optimal tracking workflows.
- Ableton Live: Plus: Unmatched for live looping, creative sound design, and live performance integration. Minus: Linear tracking and editing of long acoustic takes can feel slightly clunky compared to traditional DAWs.
- Logic Pro: Plus: Superb built-in plugins, a pristine tracking workflow, and flawless Core Audio integration right out of the box. Minus: Completely unavailable for Windows users, restricting collaboration.
- Cubase: Plus: Industry-standard comping tools make assembling the perfect multi-take performance utterly effortless. Minus: The dense, complex interface can be overwhelming and steep for beginners to master.
- GarageBand: Plus: Completely free and immediately accessible for Mac users, providing a beautifully simple entry point. Minus: Lacks advanced routing capabilities and bus management necessary for complex multi-mic setups.

The Crucial Rule: Zero-Latency Monitoring
This is the single most critical piece of advice in this entire guide. The theremin is unique because it is played purely in the air, in real-time, relying entirely on a tight, unbroken feedback loop between your ears, your brain, and your hand muscles. There are no frets, keys, or physical markers to rely on visually or tactilely. You must hear exactly what you are playing the instant you play it.
If you listen to yourself through the DAW software’s monitoring button (clicking the little speaker icon on your track to hear the software output), you are subjecting yourself to the Round-Trip Latency (RTL) I discussed earlier. Even a tiny, seemingly insignificant delay of 10 to 15 milliseconds creates a devastating psychological phenomenon.
Your brain will hear the delayed echo of the note you just moved to. Believing you are slightly out of tune because the sound hasn’t caught up to your hand position yet, your hand will instinctively twitch to correct the pitch. But because of the delay, your correction will be wrong, leading to another panicked correction. You will find yourself constantly fighting the instrument, your vibrato will become erratic and nervous, and you will play entirely out of tune without understanding why your technique has suddenly failed you. It feels exactly like trying to speak while a “speech jammer” app echoes your voice back at you.
NEVER use DAW Software Monitoring. You must mute or disable the input monitoring button on your recording track inside the DAW before you play a single note.
ALWAYS use Hardware Direct Monitoring. Enable the physical ‘Direct Monitor’ (or ‘Mix’ knob) on the front panel of your audio interface. This takes the analogue signal from the input and routes it straight to your headphones at the speed of light, bypassing the computer’s CPU and buffers entirely. You hear your hand movements in absolute, zero-latency real-time, allowing your muscle memory to function perfectly.
6. Common Problems & Solutions
Things will inevitably go wrong during a recording session, but it is vital to diagnose the physics of the problem and fix it at the source before hitting record. For example, a 50 Hz hum means alternating current from your wall socket is physically leaking into the audio path. Clicks and pops are not audio errors; they are digital buffer underruns, meaning your computer’s CPU failed to calculate the next chunk of audio in time because it was overwhelmed. Here is a quick reference guide to solving these common issues:
| Symptom | Likely Cause | Fix |
|---|---|---|
| Hum / 50 or 60 Hz Buzz | Grounding loops or power grid interference leaking into the audio path. This typically happens when your equipment draws power from multiple different wall sockets with unequal ground potentials, allowing a tiny stray electrical current to flow across your audio cables and manifest as a low, continuous buzzing noise. | Check the interface is plugged directly into the wall. Turn off light dimmers. Try a passive DI box and flip the Ground Lift switch. |
| Clicks, Pops, and Stutters | Digital buffer is too small, causing CPU overload (underrun). The CPU cannot process audio fast enough. Essentially, your computer is struggling to keep up with the mathematically demanding task of converting analogue sound waves into digital data in real time, causing the audio stream to temporarily drop out, creating sharp popping sounds. | Increase the DAW audio buffer size to 256 or 512 samples. Close all web browsers and background apps to free up CPU cores. |
| Distortion / Harsh Clipping | Input voltage level is too hot for the preamp to handle, squaring off the waveform. Because the theremin outputs a massive line-level signal, pushing it into an input designed for weak microphones forcibly slices off the very top and bottom of the audio waveform, turning your smooth sine waves into harsh, buzzy square waves. | Lower the volume knob on the theremin itself. Reduce the input gain dial on the interface to zero. Target –12 to –6 dBFS peak on meters. |
| Pitch Drifting Slowly over time | Theremin internal oscillators are not thermally stable (warmed up). Heat changes capacitance. The internal electronic components physically expand and contract slightly as they warm up to operating temperature, which infinitesimally alters their electrical values and causes the instrument’s base pitch to wander aimlessly. | Turn the instrument on and wait 20–30 full minutes before attempting to record. Retune carefully before playing. |
| Sudden Pitch Jumps / Squeals | Severe electromagnetic interference (EMI) in the room. A refrigerator compressor kicking on, a light dimmer switching state, or – in theremin designs with oscillators running at 800 kHz–1 MHz – RF from a nearby WiFi router being rectified in transistor junctions can all cause sudden pitch instability. The effect is not antenna coupling but a disruption of the oscillator’s bias point. | Hunt down the source (a WiFi router transmitting a burst, a fridge compressor kicking on). Switch it off or move the instrument to another room. |
| Playing Erratically Out of Tune | DAW software monitoring is active, causing a psychoacoustic delay loop that confuses the brain. The tiny digital delay introduced by the computer processing the audio tricks your ear into thinking you are playing the wrong note, causing your hand to instinctively but incorrectly adjust its position in a panicked, continuous feedback loop. | Disable the speaker/monitoring icon on the track in your DAW. Enable the physical Direct Monitor switch on your audio interface. |
7. If you have an Open Theremin
The Arduino-based Open Theremin is a fantastic and highly accessible instrument, but its digital nature means it has its own specific set of rules regarding its auto-calibration procedure and its extreme sensitivity to USB-C power noise. For a deep dive into getting the absolute most out of this specific model—including how to utilise its incredibly powerful MIDI and CV outputs for recording flawless, noiseless takes—please refer to the dedicated, comprehensive guide:
Guide to the Open Theremin V4, by Jinkyu Jang
8. The Ultimate Recording Checklist
Think of this as your pre-flight checklist. Just like an airline pilot, run through this every single session without fail to ensure you never lose a magical, once-in-a-lifetime performance to a silly technical error that could have been avoided.
Before You Start
- Theremin turned on and warmed up for 20+ minutes
- Room thoroughly checked for interference (all dimmers OFF)
- Laptop and phone chargers physically unplugged from walls
- Interface configured: Line input switch selected
- DAW Buffer size: Set to a low value (64–128 samples)
- Hardware Direct monitoring ON (via interface knob/button)
- DAW software input monitoring: Strictly OFF
- Record level check: Loud passages peak between -12 and -6 dBFS; absolute maximum -3 dBFS
- Silent Test run: Put on headphones and listen closely for underlying hum, buzz, or digital clicks
During & After
- Retune specifically for your current posture and room environment
- Remove all metal jewellery, heavy watches, and large belts
- Use closed-back headphones, strictly avoiding monitor speakers while tracking
- Ensure absolutely nobody is moving or walking near the theremin
- Record a quick 30-second test/reference take and listen back first
- Leave 2–3 seconds of complete silence at the start and end of the take for noise profiling
- Hit Cmd/Ctrl+S and back up your session file immediately
- Export your final raw stems as uncompressed WAV files at 24-bit / 48 kHz
Key Takeaways
- Theremin ≈ LINE LEVEL: Most modern performance theremins output at approximately line level – but always verify your specific instrument’s output specification before connecting. Use line inputs with TS cables as your default starting point. DIY builds and some vintage models may output at instrument level and need a Hi-Z input instead. When in doubt, start with the gain knob at zero and bring it up slowly while watching your meters.
- Simplest path = cleanest signal: Going direct to your audio interface, bypassing external mixers and amps, is your best default setup for pure tracking.
- Hardware monitoring only: Never, ever use DAW software monitoring when recording. Zero-latency direct monitoring is mandatory to preserve your intonation and sanity.
- Solve grounding first: If you hear hum or buzz, you must fix the electrical source in the physical room. Do not try to process or gate it away in the mix later.
- Warm up and tune: Always. No exceptions. A minimum of 20 minutes is required for the oscillators to reach thermal equilibrium before you hit record.
- Don’t forget portable recorders: A battery-powered field recorder provides the cleanest possible signal path, completely eliminating USB ground hum.
Mastering the recording of the theremin is a journey of understanding both the deep physics of the instrument and the strict rules of audio engineering. It requires patience, a meticulous attention to your environment, and an unforgiving ear for noise. But once you have your signal chain dialed in, the results are nothing short of breathtaking. I encourage you to experiment with these techniques and find the setup that best captures your magic instrument.
As you continue to refine your studio environment and recording techniques, remember that every setup presents its own unique challenges. Do not be discouraged by initial hurdles; each technical problem you solve fundamentally strengthens your understanding of your instrument. By treating your recording environment with the same meticulous care and respect that you bring to your playing technique, you ensure that the expressive, lyrical voice of your theremin translates flawlessly to the final mix. I invite you to document your progress, share your isolated stems with fellow musicians, and constantly push the boundaries of what this magical instrument can achieve in a modern production setting.
Happy recording!

✍️ About the author. Alexander Lavrinovich is an electronics engineer by training and an IT architect specialising in virtualisation by profession. Radio electronics, amateur radio, photography and the occasional musical instrument are his lifelong companions; back in the mid-2000s he was deeply involved in DJ culture and electronic music production, including running workshops on DJ equipment around 2006.
The theremin took several attempts before it finally clicked – the breakthrough came only after he had built his own D-Lev from scratch (with the precision coils a personal gift from D-Lev’s creator Eric Wallin) and attended Lydia Kavina’s masterclass.
The technical side of recording the theremin – impedance, grounding, EMI rejection, gain staging – feels natural to him rather than mysterious, drawing on his radio-electronics background, his licensed amateur-radio practice (callsign EU1L), where electromagnetic propagation and RF interference are everyday concerns, and earlier years of hands-on audio work. This guide is essentially the document he wishes he had had on the day he first plugged a theremin into a computer.